Tuesday, June 27, 2017

Turkey Suiza Tacos

I really love tacos. I love suiza enchiladas too. The other day a saw a chef season ground beef with salsa for tacos. I immediately thought about trying green salsa to season ground turkey. And how should I top them? With classic suiza ingredients of course. Well let me tell you this turned out to be AMAZING!!! My dear sister was here the first time I made them and was less than enthusiastic about a turkey taco, but she loved them. The secret to these tacos is definitely the saucy turkey filling. The addition of cumin and green salsa makes the turkey delicious all on it's own but adding the cool and spicy garnishes really puts these tacos over the top. I love the combination. Melty cheese, seasoned turkey, pickled onions, spicy jalapenos, creamy sour cream, cool avocado and cilantro. It is so dang good together. But I am here to tell you build them your way. If you don't like spicy forget the jalapenos. Hate onions skip them. I tried these tacos many ways with different combos of toppings and the saucy turkey is always the tasty part. 


It's Taco Tuesday! How about giving them a try?


Turkey Suiza Tacos
Serves 4

Ingredients


Drizzle of olive oil (I used a jalapeno flavored one)
1 lb. 93% lean ground turkey
1 tsp. ground cumin
1/2 tsp. kosher salt, or to taste 
1/4 tsp. black pepper, or to taste
Dash of red pepper flakes
1 cup green salsa, taco sauce or salsa verde
8 small flour tortillas
1 to 2 cups queso, Monterrey or mozzarella cheese, shredded
Pickled Red Onions << Click here for recipe
6 Tbsp. sour cream 
2 Avocados, peeled and sliced
Cilantro, to garnish
1 jalapeno, sliced
1 lime, cut into wedges

Directions


Preheat broiler. Put onions to pickle. 
Place a skillet over medium high heat, drizzle with olive oil. Add turkey and season with cumin, salt and pepper. Brown, breaking up any large pieces of turkey until there is no more liquid in the pan. Add green salsa and continue to cook stirring to combine. Cook until most of the liquid is absorbed by the turkey. Keep on low until ready to assemble tacos.

Place cheese on each tortilla. Place on a sheet pan under the broiler just until cheese begins to melt (about 2 to 3 minutes) and remove. Place some turkey over the top of the cheese. Top with pickled red onions, sour cream, avocado slices, cilantro and sliced jalapenos. Serve with wedges of lime.


These are the key ingredients that make the turkey so saucy good!


A melty cheese! 
The broiler melts the cheese and warms the tortilla all at once.


Linking to:
God's Growing Garden: Tuesdays with a Twist
Dizzy, Busy & Hungry: Wine'd Down Wednesday
The lazy Gastronome: What's for Dinner?
The Tumbleweed Contessa: What'd You Do This Weekend?

Monday, April 24, 2017

Masonable Mondays #7 - Cheesecake

Welcome to Masonable Mondays #7! I know it has been a while. I am sorry about that. But I think this #Masonable will make it up to you. Have you seen those new cheesecake snacks? They sell them as a divided cup with cheesecake filling on one side and chocolate, caramel or cherry topping on the other. What a perfect idea for a masonable! Now I decided to use cottage cheese to make my cheesecake snacks. I had recently seen a Dr. Oz show that boasted the nutritional values of cottage cheese. It is a great source of both protein and calcium. When you blend it up smooth it looks more like yogurt and can be used in both sweet and savory recipes. It works beautifully in these cheesecake masonables. Perfect for a snack, breakfast or dessert! I sweetened it with maple syrup, vanilla and lemon zest. It has that classic cheesecake flavor. But just think about it, the possibilities are endless. You can use light cottage cheese, neufchatel or cream cheese if you like. Any cheesecake flavor you can imagine can be adapted to a masonable. Whether you enjoy fruit toppings or indulgent rich mix-ins. You are just limited by your imagination. Here are a few ideas to get you started.


Top with any combination of fresh or frozen fruit. 
I chose thawed frozen dark cherries today. But try blueberries, peaches or strawberries. Heck top with jam or pie filling if you like.

Oreo! Try stirring in or topping with crushed oreos 
or spoon cheesecake filling on thin oreos.

What about Amaretto? Substitute Almond liquor or extract for vanilla or maple syrup. Top with toasted almonds and serve with Italian Amaretti cookies.

Or Peanut Butter Cup!? Stir in peanut butter and drizzle with melted chocolate. Or keep it simple and just chop up some Reese's peanut butter cups.

So many ideas come to mind. I hope you will try this recipe or create your own. Be sure to let me know what you put in your Cheesecake Masonable.


Cheesecake Masonable
Makes 4 - 1/2 cup servings

Supplies

4 wide mouth half pint Mason jar
4 empty fruit cup

Ingredients

2 cups cottage cheese (4% milkfat, small curd)
3 Tbsp. real maple syrup
1-1/2 tsp. vanilla
zest of small lemon
20 frozen dark cherries, thawed
24 Honey Nut Thins, Honey Cinnamon flavored

Directions

Place cottage cheese, maple syrup, vanilla and lemon zest in a blender container. Blend until smooth. Divide into 4 wide mouth half pint mason jars. Top with five cherries or toppings of you choice. Place lid on top of the jar. Stack six nut thins on lid. Place fruit cup inverted on top of nut thins and lid. Add mason jar ring to secure everything in place. Refrigerate until ready to serve.

Note: You can reduce the serving size and calories by making 6 - 1/3 cup servings. That is almost one a day for an entire week. Yum!


By the way, in case you're wondering. The Honey Cinnamon Nut Thins are AMAZING! They taste buttery and have that cinnamon roll or pancake 
flavor thing going for them. 
But you can use graham crackers or any dippers you prefer.


Picture of a not so thawed cherry.


Monday, January 30, 2017

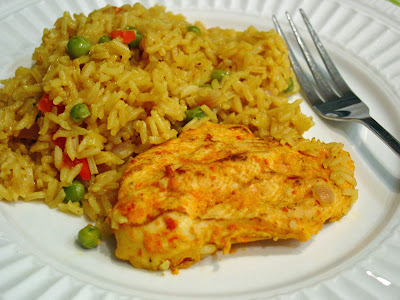
Instant Pot Piri Piri Chicken and Rice

I am so excited! I made Piri Piri Chicken in the Instant Pot!!!! The rice too! All at once, under pressure for just 4 minutes. If you are new to my blog I am a little Piri Piri obsessed. This is maybe the eleventh post I have written? Piri Piri is Portuguese in origin and popular in South Africa. It is used as a sauce, marinade or seasoning. Recipes vary but the common ingredients are bird's eye chilies, lemon, oil, red bell peppers and garlic. It is so delicious! You have to try something made with Piri Piri. 

Well let's back up a bit. After my post for Instant Pot Pork Chops and Celery Rice someone asked, "Can you use chicken?" I had to respond I don't know? So immediately I tried the technique with chicken cutlets and mushrooms. The chicken was perfectly tender but maybe a little drier than I liked. It was not moist but not dry either. So I thought a marinade would fix that. That is where Piri Piri came to mind. I really like the flavor of Piri Piri and most restaurants that serve it always offer rice as a side. It would be perfect for this technique. It worked so great! The rice was fluffy and the chicken flavorful and moist. I made my own Piri Piri sauce but you can buy bottled sauce at some grocery stores. I have seen the Nando's brand at my store. I like making my own because I can control the heat. You can use whatever hot peppers you like. Can't find bird's eye chilies? Use jalapenos or serranos. I find that as a raw sauce it is spicy but when cooked it is not that hot. The sweetness of the peppers come out when cooked. In fact, I think kids would probably enjoy the chicken and the adults can add the raw sauce for heat. It was so good! I only did two cutlets this time but I have cooked up to six without a problem. I wish I had some thin cut boneless pork chops because I am dying to try that too. I think it would be so tasty! I hope you will give Piri Piri and this #InstantPot recipe a try. Thanks for visiting today. I really appreciate it.


Instant Pot Piri Piri Chicken and Rice
Serves 4

Ingredients

4 chicken cutlets or 2 chicken breast, butterflied
Piri Piri Sauce <<Click here for recipe
Olive oil cooking spray
1-3/4 cups water
1 cup uncooked long grain white rice
1-1/2 tsp. chicken bouillon
1/2 tsp. Piri Piri Seasoning <<Click here for recipe
1/4 tsp. turmeric
1 clove garlic, minced
1/4 cup frozen peas
1/4 cup red onion, finely chopped
1/4 cup red bell pepper, finely chopped
Kosher salt, to taste

Directions

Marinate chicken in Piri Piri Sauce for 30 minutes. Keep refrigerated until ready to cook.

Place Instant Pot on Saute. When hot spray or drizzle with olive oil, brown chicken on one side only. Remove chicken and turn off heat. Add water, stir well scrapping up any brown bits off the bottom of the pot. Add rice, seasonings and garlic stir to combine. Arrange peas, onion and bell pepper on top of rice, then chicken. Cook at high pressure for 4 minutes. Turn off and let rest 5 minutes before performing a quick release. Remove Chicken and fluff rice with a fork. Taste for seasoning, adjust if necessary and serve. If you enjoy spicy foods serve with a little extra Piri Piri Sauce.


Don't have an Instant Pot or a pressure cooker? 
Try these recipes for the grill and microwave:


Want a side or topping to accompany this dish. 
Check out these older posts:


Wednesday, January 25, 2017

Instant Pot Creamy Macaroni and Cheese

When I first started researching recipes for the instant pot Mac and Cheese recipes were popping up everywhere. People boasting it was so easy even their children can prepare it. I looked at them all but which one to choose? I already have an easy stove top recipe that I love. Well last night I tried adapting it to the instant pot. It worked perfectly! Everyone is right it is so easy and fast. The best part is you don't have to drain the pasta or use multiple pots. My version is a little different from the recipes I have seen. It uses store bought Alfredo to achieve a creamy cheesy sauce. You can use any brand, light styles, four cheese flavors or even the Alfredo sauce from the refrigerator section. Size of the sauce doesn't seem to matter much either; 10, 15 or 16 ounces work with similar results. So give it a try and make it you own. Use any blend of cheese you like or any shape of pasta you have on hand. Just cook for half of the recommended time on the package. Be careful when using quick release. I didn't have any sputtering with this amount of pasta but if you double the recipe you might? So use caution maybe let release naturally for a minute or two. I left the pot on warm while stirring in the cheese, but I turned it off once everything was smooth and cheesy. It kept warm covered on OFF until the chicken I baked rested for 10 minutes. Such an easy, delicious main dish or side from the instant pot. I see making this more often than I should. I hope you enjoy it as much as we did.


Instant Pot Creamy Macaroni and Cheese
Makes 2 to 3 main-dish or 4 to 6 side-dish servings

Ingredients

2 cups water
2 cups (8 oz) elbow macaroni, uncooked
1 (16 oz) jar Alfredo sauce
1/2 cup milk
1/2 tsp. freshly ground black pepper
1/4 tsp. kosher salt
1/4 tsp. ground red pepper (optional, might be too spicy for children)
2 cups (8 oz) sharp Cheddar cheese, shredded

Directions

Add 2 cups water to instant pot, stir in macaroni. Secure with lid and set to sealing. Cook at high pressure for 4 minutes or half of the time recommended on the package. Perform a quick release. Use caution, pasta can sometimes foam up a bit and spray out of the vent. Stir macaroni breaking up any clumps. Stir in Alfredo sauce, milk, black pepper, salt, red pepper (if using) and cheese. Stir until cheese is melted and serve.

Tip: Add milk to empty Alfredo sauce jar, replace lid and shake. Pour every drop of milk and sauce mixture into pot.

Variations: Use any cheese or blend of cheeses you like. This recipe is very customizable. Works with many shapes of pasta too. Use shells or penne, just cook for half of the time recommended on the package.

Want a lighter version? Use skim milk, light Alfredo sauce and 2% cheese. It is still delicious.

Don't have a instant pot or pressure cooker? Check out this stove top version here: Creamy Mac and Cheese


Related Posts Plugin for WordPress, Blogger...